
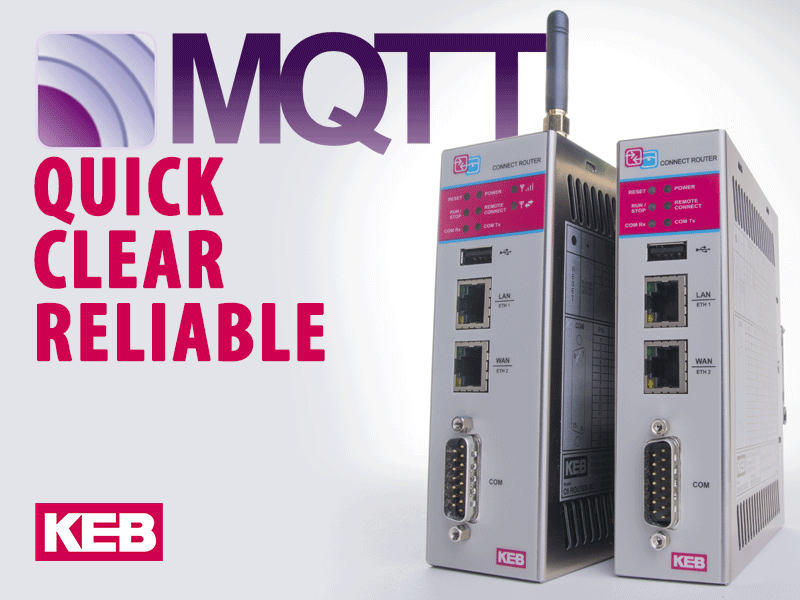
How to Send Machine Data to Microsoft Azure with KEB’s Cloud Router
Microsoft Azure is a cloud service that supports the MQTT protocol for connecting IoT (Internet of Things) devices. This allows the sending of machine data to the cloud where it can be stored, processed, analyzed, and accessed from anywhere in the world.
This article explains how to push machine data to an Azure IoT Hub and store it in Azure Cosmos DB using (1) an Azure subscription, (2) a KEB cloud router, and (3) a Combivis Studio HMI license.
Setup of Azure Services
1. Create a Microsoft Azure Account.
A free trial is available wherein the user receives a $200 credit for 30+ days to explore and test Azure services. While a credit card is required for the free trial, Azure will not automatically charge when the free trial expires. The user must elect to upgrade before any cost is incurred.
2. Create a Resource Group.

Resource groups organize the Azure services used for a particular solution. When configuring Azure resources in the following steps, add them to this resource group.
To create a resource group, navigate to the portal menu icon located on the left side of the Azure portal toolbar (pictured below).

Select All Services -> All -> Resource Groups. Select + Add, fill in the required fields, select Review + Create, then Create. The resources created in the following steps may all be found under All Services -> Internet of things. To create a resource, select the resource, then select + Add and fill in all required fields.
3. Create an IoT Hub

IoT Hubs act as MQTT brokers for IoT devices like our cloud router. IoT devices, such as the cloud router, that are used in industrial applications, are commonly referred to as “IIoT” devices for “Industrial Internet of Things” devices. The name of this and some other Azure services must be globally unique. The status of deployments may be viewed at any time in the Notifications tab which may be accessed from the toolbar at the top of the page (shown below).

Add an IoT device to the IoT Hub by navigating to the IoT Hub -> IoT Devices and selecting + New. This IoT device corresponds to the KEB cloud router. Select Symmetric key for Authentication type and check Auto-generate keys when setting up this device.
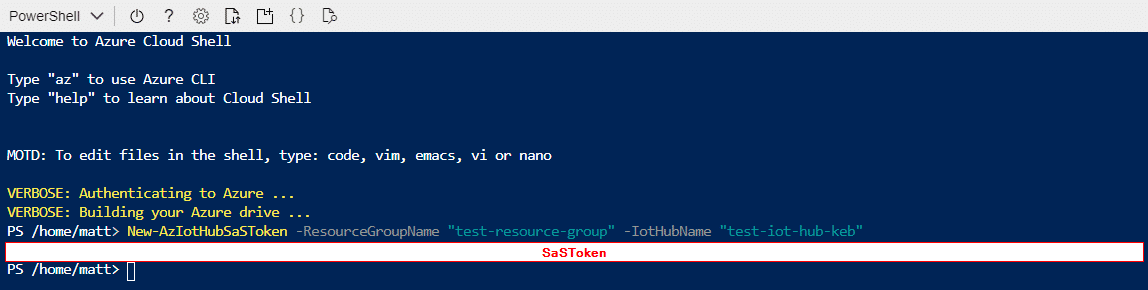
A SAS token must now be generated to allow a connection between the router and the IoT Hub. To do this, select the Cloud Shell icon located on the portal toolbar (pictured below).

Paste the following command into the Cloud Shell window, replacing myresourcegroup and myiothub with the names of your resource group and IoT Hub, respectively (keep the double-quotes):
New-AzIotHubSasToken -ResourceGroupName “myresourcegroup” -IotHubName “myiothub”
Hit the Enter key. Save the SaS token that Cloud Shell generates in the following line. This is necessary for the configuration of the router. See the example below with a resource group named test-resource-group and an IoT Hub named test-iot-hub-keb.
-

Generating a SaS Token to access an IoT Hub with Cloud Shell.
4. Create a Cosmos DB account

Select Core (SQL) for the database API (Application Programming Interface) when creating this account. SQL is the only API that is supported by the Azure Function service bindings that will be developed in the next step.
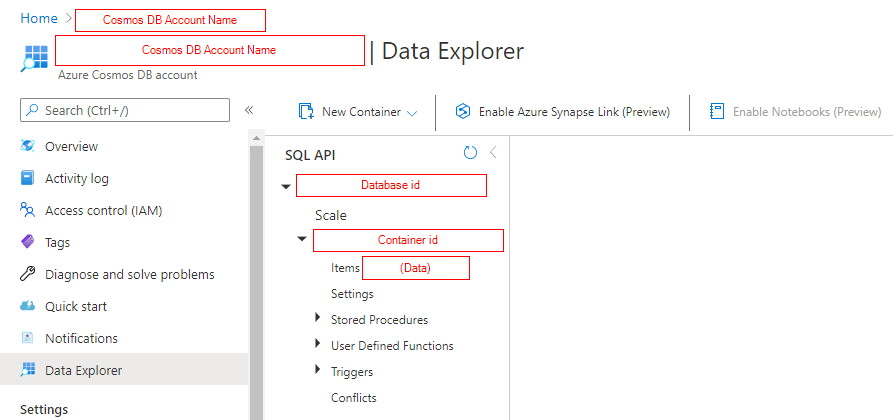
Add a container to the Cosmos DB account by navigating to the Cosmos DB account -> Data Explorer and selecting New Container. Check Create new Database id and assign a name to the Database id and Container id. Make note of these names for use in the next step. Fill in the Partition key field with a parameter that you would like to sort data by. See Microsoft’s explanation of partitioning in Azure Cosmos DB. For the cloud router messages, partition key options include: /deviceId, /tag, /value, /type, /timestamp, and /timezone. These five parameters exist for every tag value that is pushed from the router. The structure of the created SQL Cosmos DB is shown below. Our data will be found in the container under Items in JSON format.
5. Create a Function App.

KEB’s cloud routers send messages to the cloud in binary format. In order to store meaningful data, these binary messages received by the IoT Hub must be sent to an Azure Function to be decoded before being stored in Cosmos DB. Assign a name to the Function App, select Publish -> Code, select Node.js for the Runtime stack, and choose Version 12 LTS.
Add a Function to the Function App by navigating to the Function App -> Functions and selecting + Add. Choose Develop in portal and select the IoT Hub (Event Hub) template. Assign a name to the function, under Event Hub connection select New -> IoT Hub, then select your IoT Hub under Event Hub Connection. Select binary for Data type of the trigger input since the cloud router sends binary packets to the IoT Hub. Keep all other default values. Navigate to the Integration tab of the newly created function. From the template, our function now triggers each new binary packet received by the IoT Hub from the router. This is referred to as an “input binding” by Azure. Next, we need to create an output binding for our Cosmos DB storage. Select + Add output. For Binding Type, select Azure Cosmos DB, insert the name of your Cosmos DB Database id from the previous step under Database name and place your Container id in the Collection Name field. For Cosmos DB account connection select New -> Azure Cosmos DB Account and choose your account from the drop-down menu. Leave all other fields in this window as their default. Note: failure to leave the Event parameter name on the input binding and Document parameter name on the output binding as their default values will result in a function error for the code provided in this blog. These parameter names refer to parameters used in the code.
-

The layout of Azure Function with (1) an IoT Hub input binding, (2) a Javascript function, and (3) an Azure Cosmos DB output binding.
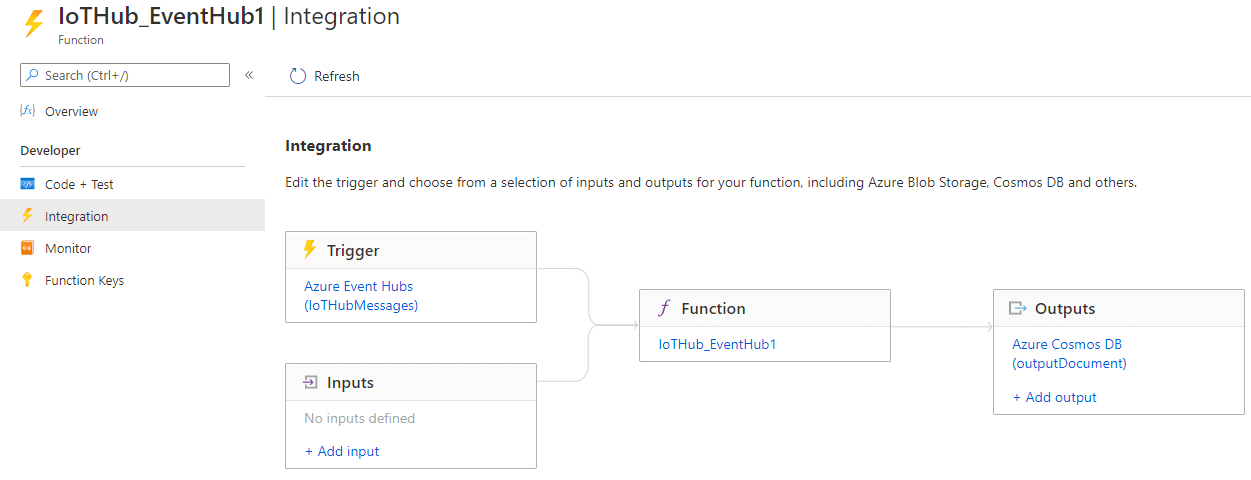
Finally, go to the Code + Test tab of the Function. Remove any auto-populated code in the index.js file shown and paste in the code from this text file. Note: do not change the function.json file. Our function app is now complete and will trigger with each IoT message, decode the message, and output it to Azure Cosmos DB where it is stored and may be further processed if desired.
Router Configuration
KEB’s cloud routers include the Studio HMI runtime. This runtime allows human-machine interface (HMI) projects to run on the routers. KEB’s Combivis Studio HMI software allows for the designing and uploading of these HMI projects to a KEB router that includes the HMI runtime. Combivis Studio HMI software features data loggers, recipes, alarms, email/SMS notifications, and many customizable UI objects. Refer to this video for a quick run-through of how to set up a Studio HMI project with a data logger that pushes data to a cloud service. The data that is logged in this video comes from a Compactlogix PLC. However, Studio HMI comes with over 40 drivers and can be used with KEB, as well as 3rd party, PLC platforms including Allen-Bradley, Siemens, and Schneider.
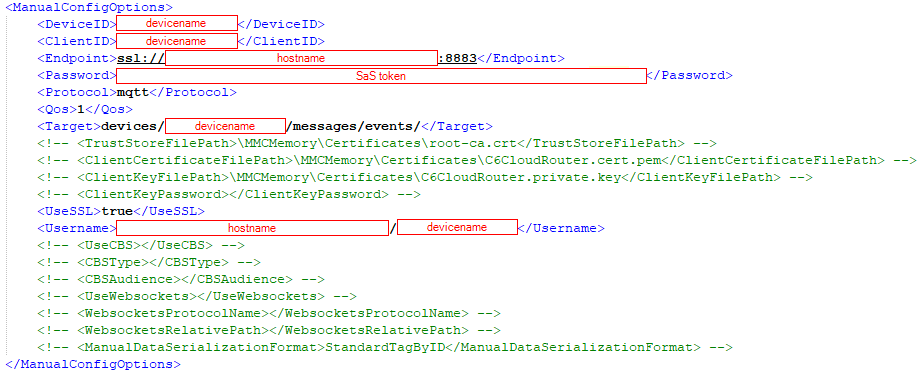
When a Studio HMI project is created, a cloud runtime configuration XML file is created in the Resources folder of the project directory named cloudruntimeconfig.xml. Edit this XML file with a text editor (Notepad++ is recommended). Uncomment the lines shown below under <ManualConfigOptions>.
Place the name of your IoT device in the DeviceID and ClientID fields. The Endpoint field takes the form “ssl://hostname:8883” where hostname is found in the Overview tab of the IoT Hub in the Azure portal. Place the SaS token obtained from Cloud Shell in the Password field. The Target field takes the form “devices/devicename/messages/events/” where devicename is the name of your IoT device. The Username field is formatted as “hostname/devicename” where hostname and devicename are as they were previously described.
-

Combivis Studio HMI project cloud configuration file.
Save the edited configuration file. Once the Studio HMI project and cloud configuration XML are complete, the project may be downloaded to the router and started. If the router is connected to the internet, data can be pushed to the Azure cloud. See a sample output in a Cosmos DB container with the partition key “/timestamp” pictured below.
-

Sample Cosmos DB output of Azure Function.
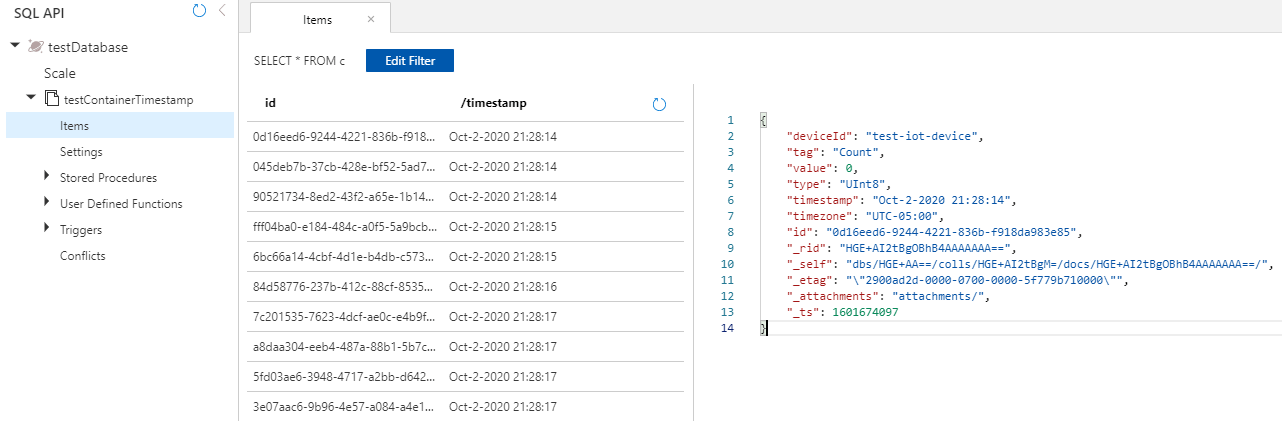
The first five fields of deviceId, tag, value, type, and timestamp are all communicated from the router and decoded in the Function App. The fields that follow id, _rid, etc. are assigned by Azure.
KEB – The Key to Connecting your Device to the Azure
This is an overview of one possible implementation using KEB’s IoT Edge Router and Azure cloud. Contact a KEB America engineer today to discuss how we can help develop your next-generation control.
Related Articles

Let's Work Together
Connect with us today to learn more about our industrial automation solutions—and how to commission them for your application.