
Setup Guide: Implicit and Explicit Messaging for Beckhoff PLCs and KEB Drives Using Logix 5000 Software
In this article, you will learn how to set up implicit and explicit messaging to enable communication between a Beckhoff PLC and KEB drive using Logix 5000 software. Each section will have a video tutorial to help you follow along and set up the communication. Let’s begin with the setup of implicit messaging.
Before we begin, read this article on setting up EtherNet/IP communication in KEB’s COMBIVIS 6 and Beckhoff’s Logix 5000 software. You will need to have the proper EDS files from KEB on your desktop and a project open before you begin this tutorial. If you have everything ready based on the link above, you can begin the setup for implicit and explicit messaging.
1. Setting Up Implicit Messaging
Watch the video below for a step-by-step tutorial on the implicit messaging setup. Continue below for a text and image-based guide for setting up explicit messaging.
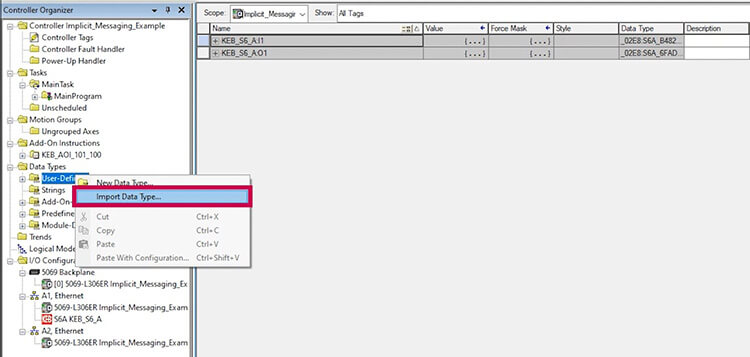
To begin this setup, open your project in Logix 5000 and right-click the words “User-defined” under data types. Find “import data type” and click to open up this window.
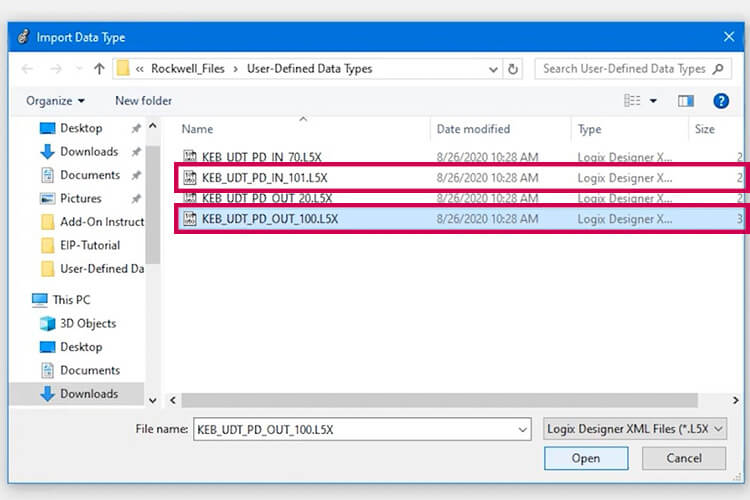
In the “Import Data Type” window, find two files on your desktop titled “KEB UDT PD OUT 100” and “KEB UDT PD IN 101.”
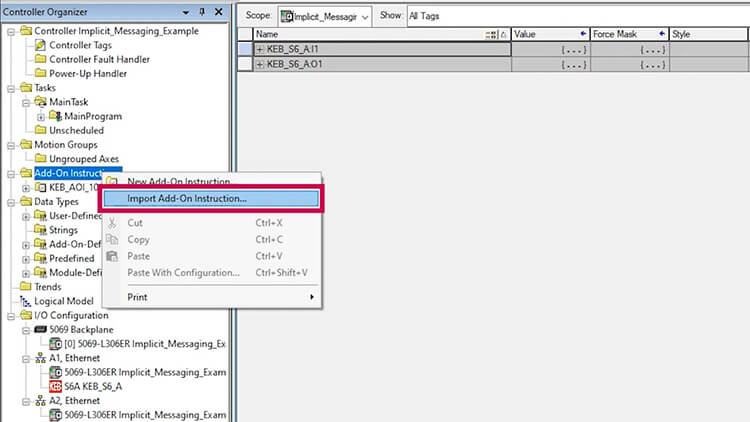
Open the controller organizer window on the left and navigate to the “Add-On Instructions” folder. Right-click on the folder and choose “Import Add-On Instructions”. Select the file “KEB AOI 101 100” from your computer.
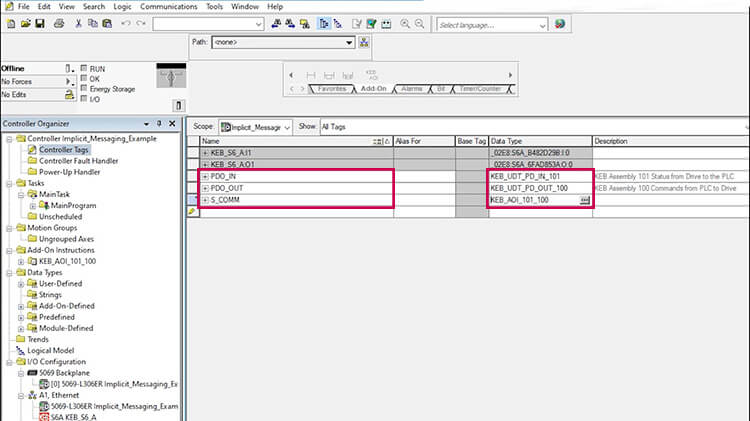
Select the folder controller tags on the left window, go to “edit tags” at the bottom of the page. Then, on the main screen, type the following values into the “Names” column: PDO IN, PDO OUT, and S6COMM. Finally, connect these data types to KEB UDT PD OUT 100, KEB UDT PD IN 101, and KEB AOI 101 100.
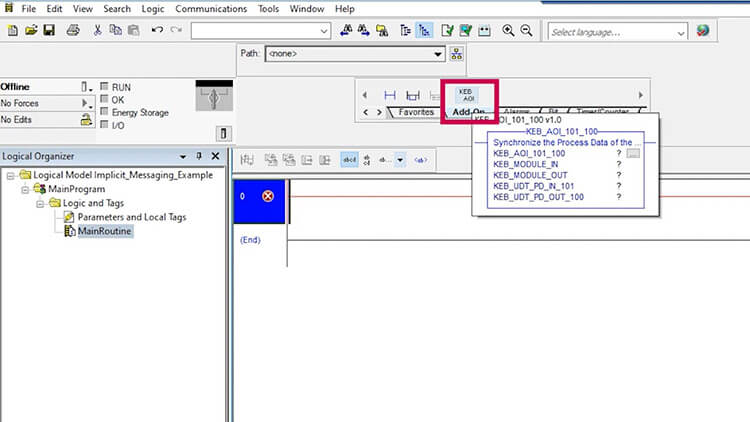
Next, go to the logic model by clicking the logical model icon at the navigation bar at the top of the screen. Select the “Add-On tab and click the KEB AOI button to add a ladder rung (Figure 5).
Add to the rung and select the following information for the block. S6_COMM, KEB_S6A:I1.DATA, KEB_S6A:O1.DATA, PDO_IN, PDO_OUT.
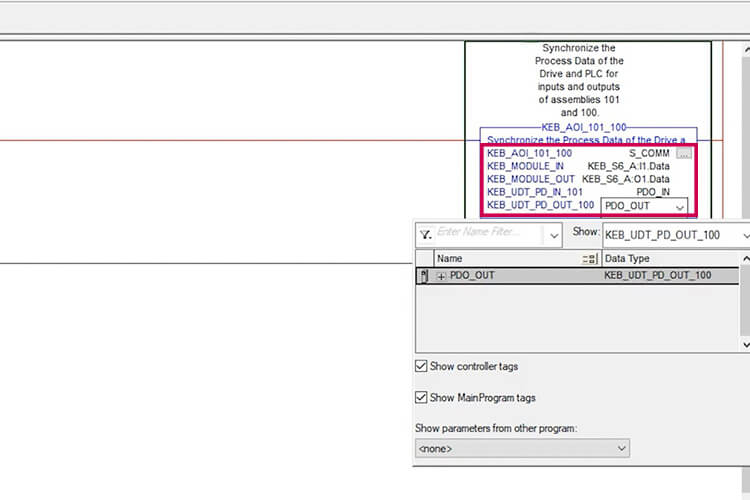
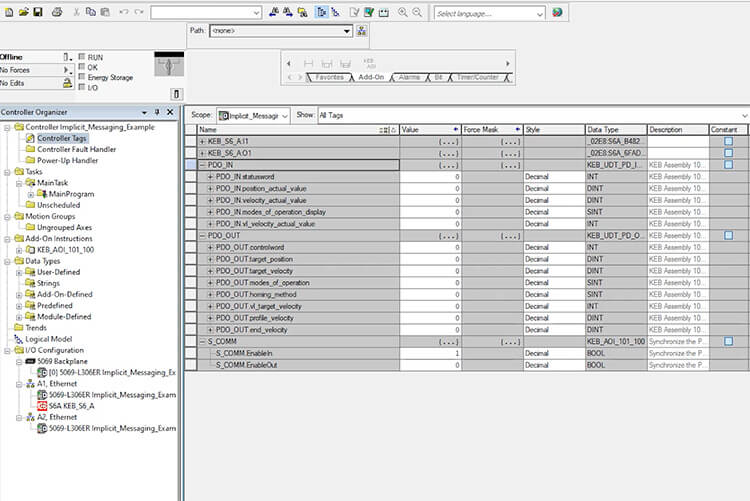
The implicit messaging setup is now complete. When you are done, your screen should look similar to the image below (figure 7) when you expand PDO_IN, PDO_OUT, and S_COMM.
2. Setting Up Explicit Messaging
In this second part, we will demonstrate how to set up explicit Messaging in Beckhoff’s Logix 5000 software with a KEB drive.
Watch the video above for a walk-through of this set up. Continue below for a text and image based guide for setting up explicit messaging.
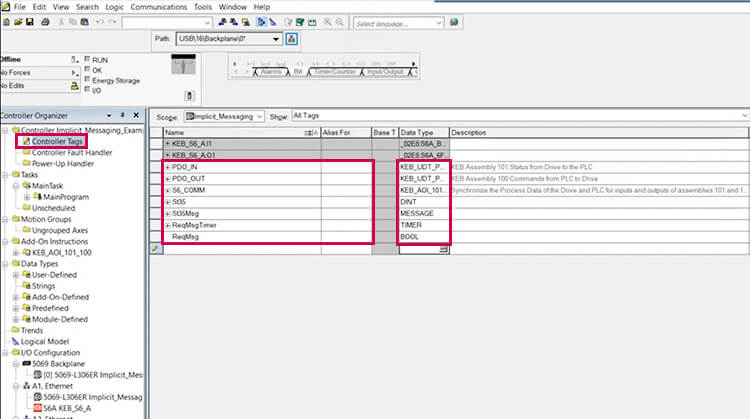
Under controller tags, go to edit tags at the bottom of the page and type in these tags (Figure 1). St35, St35MSg, ReqMsgTimer, ReqMsg. Set their data types to DINT, Message, Timer, and BOOL respectively.
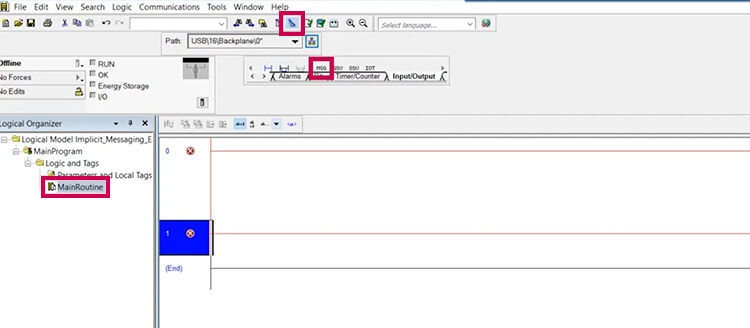
Next go to the logic model and add in a ladder rung (Figure 2). Add the Message block from Input/Output.
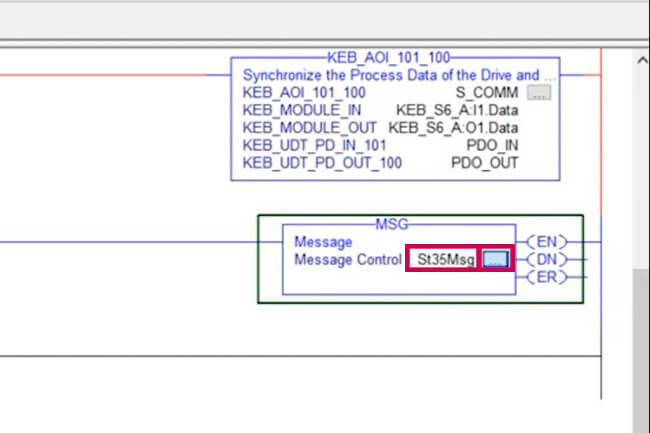
Set the message control to be St35Msg, and then open it up to configure it further by clicking the box to the right of Message Control (Figure 3).
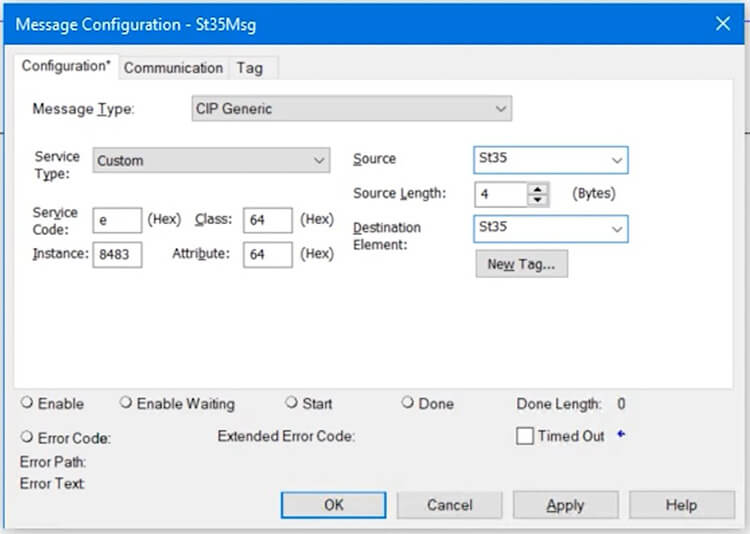
The window shown in image above (Figure 4) should open in the configuration tab. Set the service code to “e”, the instance to “8483,” the class and attribute to “64,” the source element and destination to “St35,” and the source length to “4.”
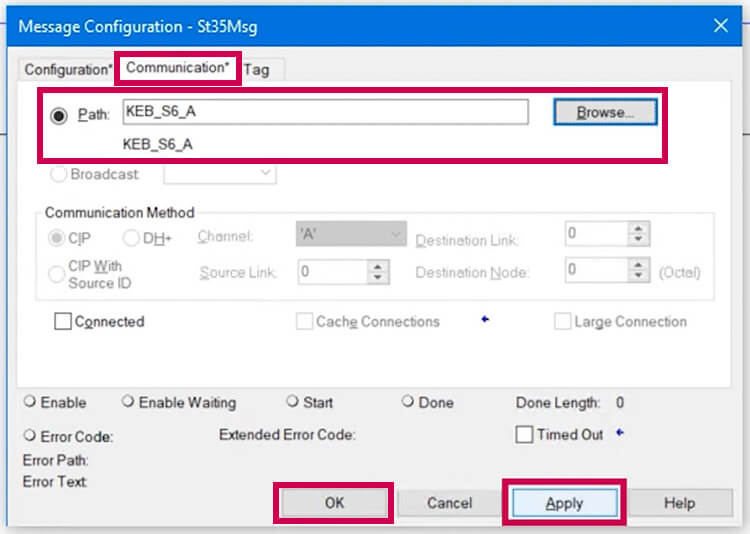
In the same window, select the “communication” tab at the top and set the path to your device (Figure 5). In this case, it is a KEB S6 A drive. After it’s set you can click “apply” and then “ok.”
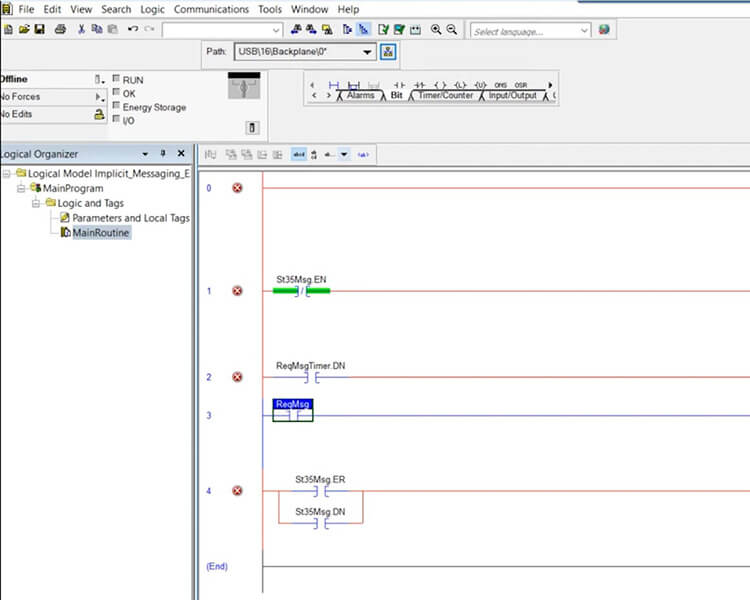
Add in two ladder rungs before the MSG rung and one after it (Figure 6). On the first rung add in the examine off and timer on delay. On the second rung add in an examine on bit and an output Latch. On the third rung add in an examine on bit. On the fourth rung add in a branch and add in an examine on to both sides. Add an output unlatch to the end of the fourth rung.
Name all of the items on the rungs as follows. Examine off is “St35Msg.EN,” Examine on is “ReqMsgTimer.Dn,” examine on is “ReqMsg,” the top branch will be “St35Msg.ER” and the bottom branch will be “StMsg.DN.”
Please follow these instructions to complete the setup for implicit and explicit messaging on Beckhoff Logix 5000 software with KEB drives using EtherNet/IP communication.
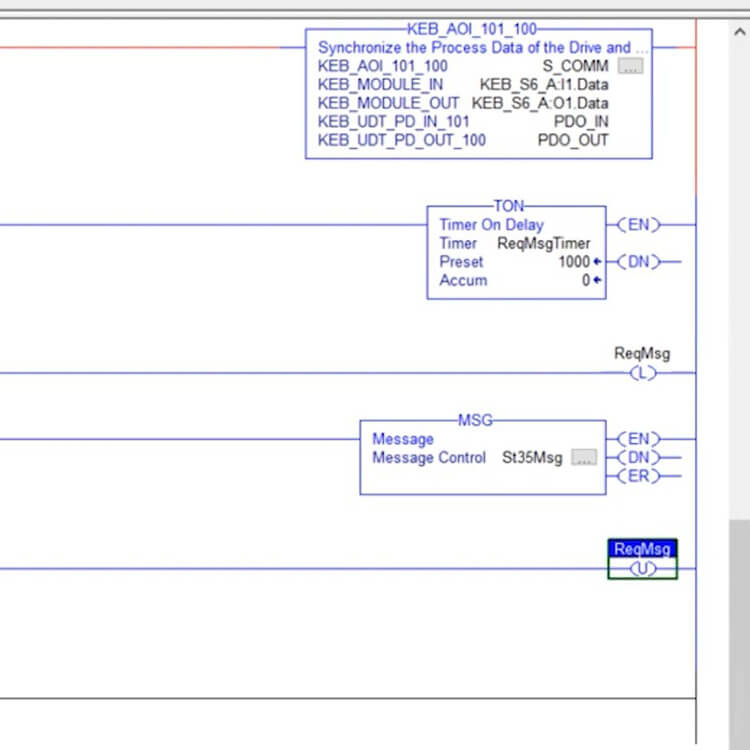
To begin, locate the far right side of the window (Figure 7) and name the output latch “ReqMsg.” Next, set up the timer block in rung 1 by adding “ReqMsgTimer” to time and “1000” to preset. Remember to label both the latch and unlatch rungs as “ReqMsg.”
If you have any questions, feel free to reach out to a KEB controls engineer for assistance.
Related Articles
Let's Work Together
Connect with us today to learn more about our industrial automation solutions—and how to commission them for your application.